PoE 2 Monk Build Guide: Chaos Inoculation and One-Button Mastery
Path of Exile 2 has brought many new mechanics, from Chaos Inoculation (CI) changes to freeze threshold changes, while keeping the fast action and strategic depth the game is known for. This Monk build focuses on one-button mastery through Storm Wave as the core skill, while stacking energy shield to conquer wave after wave of endgame monsters. Key elements include Kel’s Inoculation, strong stun threshold management through Self Mortification and Ascetism, plus solutions to freeze issues using Ice Breaker. The goal is a stable approach to the endgame that combines high damage with defenses that rely on synergy between passives, gear and Ghost Dance. Below is a detailed explanation of how all this fits together, along with gear, passives and skill tips for a solid Monk build in PoE 2.
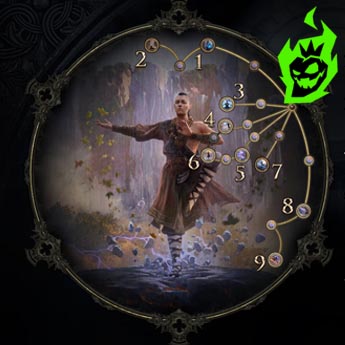
Monk Build Overview
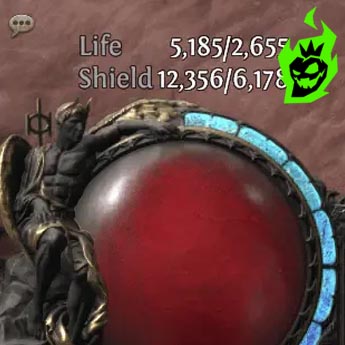
A Monk in PoE 2 usually revolves around high critical chance, strong mobility and a balanced approach to offense and defense. In this Monk setup the focus is Chaos Inoculation, where life is essentially fixed at one point and maximum survivability is based on large energy shield pools. Offense is based on Storm Wave with passives that push critical multi and elemental damage.
This build thrives on synergy between core passives and recommended gear, mostly to withstand stuns and freeze effects in endgame Waystones or pinnacle boss fights. A few specialized passives offset the drawbacks of a single life model, so incoming damage doesn’t stun the character repeatedly. More on these passives, items and how everything works together in the sections below.
The Monk design is simple in standard mapping: press one main skill and big packs are handled, skill swaps for good boss damage. The next sections cover solutions for stuns, freeze mechanics, gear optimization and recommended passives for a comfortable endgame.
Managing Stun Threshold for the Monk

Stun management is key for a Chaos Inoculation Monk because an energy-shield-based life pool has only one point of life. That one point of life often translates to near-constant stuns unless defensive measures are in place. Passives like Self Mortification and Ascetism raise the stun threshold by referencing maximum energy shield instead of life total, mitigating the threat of infinite stuns. Additional synergy can come from jewels that grant “gain additional stun threshold equal to X% of maximum energy shield.”
The table below lists important passives and jewels that increase the stun threshold. At least two or three of these should be included to stay mobile in combat:
| Passive / Jewel | Effect on Stun Threshold | Location / Source |
|---|---|---|
| Self Mortification | +20% of ES as stun threshold instead of life | Topside of the Dexterity/Intelligence area |
| Ascetism | Increases the base ES-to-stun-threshold ratio to 30% | Adjacent to Self Mortification |
| Jewels with Stun Threshold | “Gain additional stun threshold equal to 10% of max ES” | Jewel sockets across the tree |
| Substantial ES Gear | Higher ES translates to higher effective stun threshold | Chest, Helmet, Gloves, etc. |
Combining these options turns the single life drawback of CI into a manageable quirk. One can slot two or three unique jewels to have a stable threshold. Additional synergy comes from passives that grant extra energy shield to sustain an even higher stun threshold.
Dealing with Freeze in Endgame Content
Freeze can stop movement, attacking and using flasks. In PoE 2 some endgame bosses and map modifiers increase the chance to be frozen. A Monk build using Chaos Inoculation must account for freeze vulnerability, especially with low life that will trigger freeze effects frequently.
Here’s a short list to reduce or nullify freeze:
- Ice Breaker: This node grants 50% of max ES as freeze threshold, acting as a strong defense by requiring much more freeze application from enemies.
- High ES Gear: More ES means better synergy with Ice Breaker.
- Charm Modifiers: Some accessories or flasks grant temporary immunity. This is weaker against repeated freeze hits but still helps.
 Campaign Boost
![]() Full campaign completion
Full campaign completion
![]() Lots of loot
Lots of loot
![]() All the bosses killed
All the bosses killed
 Trial of Sekhemas Boost
![]() Chance to get weapon or gear
Chance to get weapon or gear
![]() Crafting materials and orbs
Crafting materials and orbs
![]() All elementals killed
All elementals killed
 Power Leveling
![]() Reach level 100
Reach level 100
![]() Safety Guarantee
Safety Guarantee
![]() Start endgame faster
Start endgame faster
 Basic Content Unlock Bundle
![]() Full campaing unlock
Full campaing unlock
![]() High content access
High content access
![]() Quick result
Quick result
![]()
![]()
Having a freeze mitigation plan makes mapping and bossing easier. Building enough freeze threshold so consecutive freeze attempts don’t lock the character in place is especially helpful against Waystone bosses that spam multiple chilling skills.
Essential Passives and Nodes for Damage
Damage optimization is about skill-based criticals, elemental nodes and synergy with Storm Wave or other favorite attacks. A Monk leans into critical strike chance, lightning damage and melee synergy to multiply overall damage in PoE 2. The higher the base damage, the faster packs die.
Below is the table of passives that boost damage for a Monk focused on lightning and physical scaling:
| Node | Key Benefit | Tree Location |
|---|---|---|
| Alternating Current | Boosts critical strike chance for elemental attacks | Near the top Intelligence side |
| Moment of Truth | Increases overall crit damage multiplier | Pathing around the Shadow/Monk cluster |
| Common Calamity | Adds lightning damage to attacks and spells | Down in the Templar-ish area |
| Eka and Thunder | Raises lightning damage scaling further | Nearby branching passives |
| Heart Stopping | Additional AR, ensures enough Attack Rating for skill usage | On the main path to the central node |
Mix two or more of these passives and you get a powerful synergy, more damage and faster clearing. Higher base damage also applies to Tempest Flurry or Tempest Bell if added for single target.
Itemization Strategy for the Monk Build
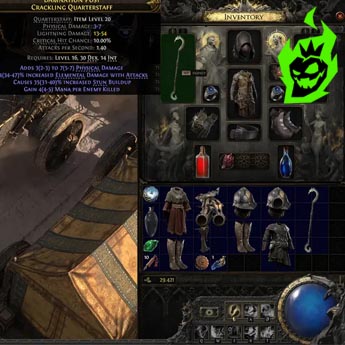
Equipment choices are crucial for any CI build. Helmets, body armors, boots and accessories should give as much energy shield as possible, while covering essential elemental resistances and stat requirements. Some unique items or well-crafted rares grant extra stun and freeze threshold, offsetting the one life drawback. Here’s the table of suggested gear for each slot:
| Slot | Item or Stat Priority | Reasoning |
|---|---|---|
| Helmet | High ES (300–500+ if possible), optional Resistances | Maximizes synergy with Subterfuge Mask, stuns |
| Body Armor | Highest ES available, no extra steps for hybrid stats | Primary pool for bulk ES and survival |
| Gloves | +1 to Melee Gems, Attack Speed, ES if possible | Damage plus moderate ES for more threshold |
| Boots | Movement Speed, Resistances, ES in moderate quantity | Mobility, defenses, synergy with Youth/Ghost |
| Weapon | Elemental % damage or Physical base, Crit chance, Attack Speed | Pushes Storm Wave or Tempest Flurry damage |
| Amulet | Crit chance, Crit multiplier, Intelligence or ES bonuses | Major source of extra crit for wave clearing |
| Rings | Resistances, Life/Mana where relevant, Added Lightning or Physical | Balance out stats, add small damage bonus |
| Belt | ES, Resistances, “% of Flask Recovery Applied Instantly” if feasible | Sustains immediate ES recovery |
Try to get the best ES rolls across all slots to get around 3k-5k ES early on, later pushing to 5k or more. Higher ES numbers pair very well with any freeze and stun threshold passives.
Gem Setup and Skill Rotation

Gem setup has a big impact on gameplay. This Monk build uses a one-button approach for mapping: Storm Wave, with secondary attacks like Tempest Flurry or Tempest Bell for bosses or advanced Waystones. Stacking critical strike support gems and synergy with elemental and melee passives boosts damage for each skill.
Here’s a short list of recommended gem setups:
- Storm Wave: With Marshall Tempo, Lightning Fusion, Primal Armament, Upheaval for wave clearing.
- Herald of Thunder: With Innervate, Deadly Herald.
- Ghost Dance: Active aura for defensive synergy, with Eternal Youth to redirect life flask recovery to ES.
- Blink: Movement skill for positioning, with any extra utility like Arcane Tempo.
- Tempest Flurry / Tempest Bell: Secondary for boss fights, usually 3- or 4-linked with Concentrated Effect, Close Combat and optional Overabundance or Heavy Swing.
This rotation is casual mapping friendly. Swapping or replacing single-target gems before boss fights gives more burst damage. A quick switch from Storm Wave supports to Tempest Flurry supports can push total damage even higher against endgame bosses.
Energy Shield Sustain and Additional Mechanics
Running Chaos Inoculation requires a solid energy shield sustain plan. PoE 2 has many nodes and ways to replenish ES. Combining Eternal Youth with life flasks, plus Ghost Dance or passives around evasion, keeps the Monk safe even in long fights.
Here’s the table of ES sustain mechanics:
| Mechanic | Effect on Energy Shield | Location |
|---|---|---|
| Eternal Youth | Directs life flask recovery to ES instead of life | Keystone near Witch area |
| Ghost Dance | Recover ES equal to 5% of Evasion each time Ghost Shroud is consumed | On the Dexterity/Intelligence side |
| Subterfuge Mask | Converts helmet ES into evasion, fueling Ghost Dance’s recovery potential | Anoint on amulet to enable effect |
| Instant Flask | “% of Flask Recovery Applied Instantly” mod on belts, quick ES top-ups | Belt or Hybrid Flask prefix |
| Evasion/Energy nodes | Provide additional synergy with Ghost Dance by improving both ES and Evasion | Various passives on the tree |
Taking multiple sustain layers creates a consistent defense that avoids stuns and recovers from spike damage. Ghost Dance’s interaction with high evasion is especially strong, refilling ES every few seconds when hit. Having at least 3k-4k ES and then scaling up keeps the Monk safe.
Final Thoughts on the PoE 2 Monk Build
This Chaos Inoculation Monk build combines strong defenses from high ES, reliable stun and freeze threshold solutions and significant elemental damage. As PoE 2 gets more endgame Waystones and updates, the passives, items and skill links remain universal. The synergy between Ice Breaker, Self Mortification and fully ES geared setup gives a big advantage against stuns and freezing hits. Storm Wave or a single-target swap with Tempest Bell kills everything fast, so you progress through the endgame quickly.
By choosing the passives that mitigate stuns, freeze and other forms of crowd control, the Monk can act while dealing critical strikes. Investing in gear that prioritizes ES and crit stats seals the deal. With the right coordination of skill setups and recommended passives, this Monk is ready for PoE 2’s endgame.