Path of Exile 2 Ascendancy Guide: Advanced Advice for Mastering Trials
The world of Path of Exile 2 (PoE 2) is all about pushing your character builds to the limit and taking on brutal encounters. Ascendancy classes give you a massive boost in power through skill points that unlock special perks. The journey to Ascendancy in PoE 2 involves completing two main Trials: the Trial of Seumas and the Trial of Chaos. Knowing the mechanics of these Trials – from Honor Resistance to monster afflictions – sets you up for a more reliable path to higher tiers of power. Understanding the factors that affect each of these Trials – movement speed, relic choices, resource management – gives you more control over these tough challenges.
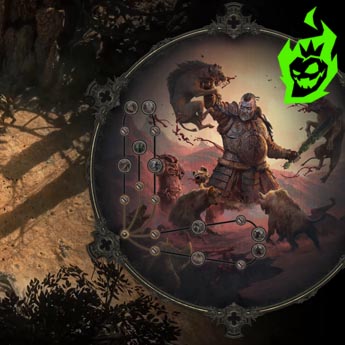
Fundamental Overview of Ascendancy Trials in Path of Exile 2
Ascendancy Trials are the core endgame for many players in PoE 2. Each Trial type has its own mechanics, currencies and strategies. The Trial of Seumas is based on an Honor system, which is a resource pool that drains when you take damage. The Trial of Chaos is a multi-stage gauntlet that piles negative afflictions on you, making each wave tougher.
Before facing either Trial you might overlevel, stock up on flasks and fine tune your gear. You’ll often focus on movement speed, stuns and damage. Specific mechanics will vary by build but fundamentals like crowd control (CC) or avoiding ground effects apply to most. Ascendancy Trials also drop exclusive rewards like relics for Honor based mechanics and Soul Cores for Chaos based encounters. These items give you ways to mitigate risk or increase damage. Here’s a summary table of the main differences between the two Trials:
| Trial Type | Key Resource | Minimum Level for Endgame Steps | Number of Floors or Rounds | Key Mechanics |
|---|---|---|---|---|
| Trial of Seumas | Honor | 60 (third Ascendancy), 75 (final) | 3–4 floors (depending on coin) | Maintain Honor by avoiding hits |
| Trial of Chaos | Negative Afflictions | 75 (final Ascendancy) | 10 rounds (for endgame) | Stack afflictions each round |
These Trials grant Ascendancy points if you complete them at the required level and floor/round count. Trying them too early will result in repeated failures so higher levels are more stable. The loot from each Trial includes currency items, high value relics or special modifiers. Progress is tracked in-game so each step of the Trials gets harder over time.
Strategies for the Trial of Seumas
The Trial of Seumas is based on Honor as a fragile resource that drains when you take damage. Testing each player’s ability to maintain Honor the Trial punishes those who rush in. Many builds benefit from a solid Honor Resistance which reduces the rate of Honor loss. Overleveling by 10+ levels above the Trial’s requirement is a common recommendation as stronger defenses and more damage is a big bonus.
Players often farm the easier versions of the Trial of Seumas first and collect relics that improve Honor related stats. Once you have enough relics it becomes easier to meet the recommended 75% Honor Resistance threshold. The difference between 0 and 75% Honor Resistance is huge, that’s a lot more survivability. Taking time to confirm enough Honor Restoration or bonuses from boons also helps with a more consistent outcome.
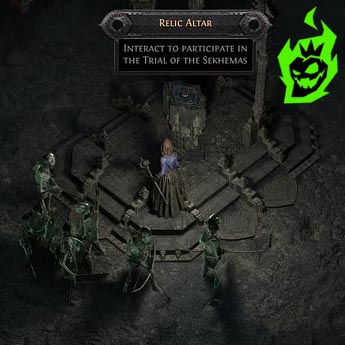
Important Relic Stats for Trial of Seumas
- Honor Resistance (Minimum 75%)
- Honor Restoration on Entering Boss Arena
- Increased Armor or Evasion
- Extra AoE Damage or Boss Damage
- Increased Movement Speed
Getting these relic stats will result in less Honor loss especially in the final Scorpion or dual knights fight. Builds that rely on mobility will find Honor drain less of an issue as it’s easier to dodge lethal hits. Tanky builds will look for high Honor Restoration to sustain through floors of traps or boss waves.
 Campaign Boost
![]() Full campaign completion
Full campaign completion
![]() Lots of loot
Lots of loot
![]() All the bosses killed
All the bosses killed
 Power Leveling
![]() Reach level 100
Reach level 100
![]() Safety Guarantee
Safety Guarantee
![]() Start endgame faster
Start endgame faster
 All Campaign Bosses Boost
![]() Full campaign bosses clear
Full campaign bosses clear
![]() Rewards from 3 acts
Rewards from 3 acts
![]() Tons of gear, materials, gems
Tons of gear, materials, gems
 Basic Content Unlock Bundle
![]() Full campaing unlock
Full campaing unlock
![]() High content access
High content access
![]() Quick result
Quick result
![]()
![]()
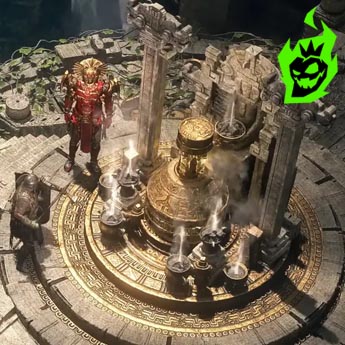
The Trial of Seumas often includes puzzle-like sections like The Maze or the Hourglass zone. These rooms have no timer so it’s better to take your time and clear hazards. Honor drains fast if you leave ground effects or small minions unattended. Clearing methodically each path to the next floor will make it much safer. When the boss fights happen, circling around the boss and waiting for attack animations to end is a good strategy especially if stuns are part of the build.
Navigating the Trial of Chaos with Confidence
The Trial of Chaos involves negative afflictions that stack over multiple rounds. Each round you complete you get to choose between 3 afflictions and each one has severe consequences. Strategies revolve around avoiding the afflictions that give you storm caller runes or volatile fiends. Another common advice is to avoid the affliction “Damaged Defenses” which reduces energy shield, armor and evasion.
Some builds prefer to pick the least destructive afflictions like moderate monster damage or moderate monster movement speed. Getting any defensive affliction at a low tier is sometimes acceptable but stacking high tier ones can result in sudden deaths. Between rounds you can use a portal to refill flasks or change gear. Resource management is crucial in the later trials especially when facing the final boss or tricky waves like Soul Core puzzles.
Typical Negative Afflictions to Watch
| Negative Affliction | Tier 1 Effect | Tier 2 Effect | Recommendation |
|---|---|---|---|
| Monster Speed | ~20% increased speed | ~40% increased speed | Safer at Tier 1 than Tier 2 |
| Chaos Damage Boost | ~30% more chaos damage from foes | ~80% more chaos damage from foes | Early tier manageable; Tier 2 risky |
| Damaged Defenses | -50% total defenses (armor/evasion/ES) | -80% total defenses | Avoid if reliant on ES or armor |
| Volatile Fiends | Explosive Fiends spawn on kills | More frequent, bigger explosions | Avoid due to intense dodging needed |
| Stalking Shades | Shadows chase player, inflicting damage | Additional projectiles from shadows | Highly destructive, better skipped |
Minimal affliction stacking creates a safer environment for standard builds. A few less dangerous afflictions might even allow for comfortable wave progression. Synergy with your main defenses is key: for example a build based on massive life can handle moderate defenses reduction while an ES-based build will collapse under the same affliction.
Late in the Trial of Chaos a boss appears. Foes like the Chimera, the scourge from the skies or the savage owl each have their own patterns. The owl’s spin attack deals extreme physical damage so traveling in wide arcs around the arena helps. The Chimera’s AoE ground effects are lethal if approached carelessly. Meanwhile the flying boss spends long periods off-screen leaving a small window of DPS when it finally lands.
Ascendancy Boss Insights and Gear Considerations
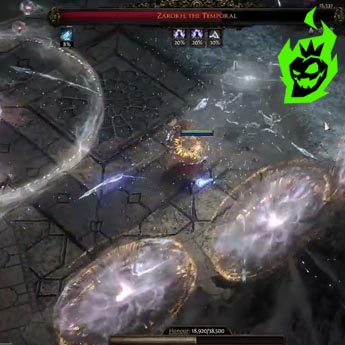
To get to the final Ascendancy points you need to kill tough bosses in both the Trial of Seumas and the Trial of Chaos. These fights have unique mechanics and each boss punishes different playstyles. For example the Scorpion boss in the Trial of Seumas has ground based poison effects and leaps that catch players off guard. In the Trial of Chaos the final fight might bring a flurry of projectiles or physical hits that shred your defenses.
Players often focus on CC like stuns or freeze effects to lock down these bosses and optimize DPS. Another approach is to increase movement speed so you can circle around dangerous attacks. Bringing gear that addresses each boss’s damage type is often helpful as well. For example an owl boss dealing heavy physical hits is more manageable with high armor or physical damage reduction flasks. Meanwhile an acid based scorpion might require a stronger approach to chaos resistance or life regeneration.
Recommended Gear Upgrades and Their Typical Impact
| Upgrade Type | Example | Reason for Effectiveness |
|---|---|---|
| Movement Speed Boost | 30% increased movement on boots | Avoid ground effects and projectiles |
| Chaos Resistance | +30–40% chaos resist on gear or flasks | Great for poison-based or chaos-based foes |
| High Armor Items | Chest piece with 1200+ base armor | Absorbs multiple physical hits |
| CC Focused Weapon | High stun threshold reduction on maces | Keeps bosses stunned, opening DPS window |
| Life Recovery Flasks | Saturated or Catalyzed Life Flasks | Quick recovery between boss phases |
Upgrading in these areas gives you more safety when dealing with unpredictable boss patterns. Using unique items that synergize with your Ascendancy path is another way to go. Overleveling is a recurring theme, make sure your skill gems are comfortable. Farming currency from mapping or side farming also gives you better gear, less risk for the final Ascendancy Trials.
Boss fights are a “move in, hit, move out” cycle. Studying each boss’s telegraphs is super important, one heavy hit can kill you or inflict lethal damage in the middle of stacked afflictions. Being disciplined in these fights, flasks and positioning is key to success.
Final Thoughts on PoE 2 Ascendancy Progression
Ascendancy in PoE 2 gives you huge power spikes through skill points but getting them is not always easy. Preparing for Trial of Seumas requires high Honor Resistance, measured pace and strategic relic usage. Trial of Chaos forces you to juggle negative afflictions that can kill each round. Getting the right relics in Seumas and choosing manageable afflictions in Chaos is the two main ways to succeed or fail.
Building defenses is a recurring theme when facing high-end Trials. Armor, evasion, energy shield or a mix of each is crucial to survive the endgame. Movement speed is another common advice to avoid lethal attacks. Overleveling is universal advice, make sure your skill gems, DPS and defenses are strong enough for the Trials’ scaling damage. Here is the approximate Ascendancy point structure:
| Ascendancy Tier | Level Requirement | Trials Required | Points Gained |
|---|---|---|---|
| First Ascendancy | ~Act 2 (Campaign) | 1 completed Trial of Seumas (low-level version) | 2 |
| Second Ascendancy | ~Act 3 (Campaign) | 4 minor Trials of Chaos (campaign-tier) | 2 |
| Third Ascendancy | 60+ or 75+ | Seumas Trial (minimum 3 floors) or Chaos 10-round | 2 |
| Fourth Ascendancy | 75+ | Seumas secondus or final Chaos confrontation | 2 |
Getting all 8 Ascendancy points refines your character’s specialization and synergy with the chosen Ascendancy class. While each way is different, the key is to balance risk and reward throughout the Trials. The Scorpion boss in the last floor or the savage afflictions in Chaos will test your build and your awareness of each zone’s mechanics.
Building a PoE 2 character around Ascendancy Trials means learning from each attempt. Mastering Honor management or understanding how certain afflictions damage defenses gives you a sense of progression beyond XP. Getting the right relics, choosing the right afflictions and maxing out defensive layers gives you more consistent results. PoE 2 Trials are intense but give unique loot and memorable boss fights for many builds.